Sunday, March 8, 2009

Faux Dichroic glass bottle
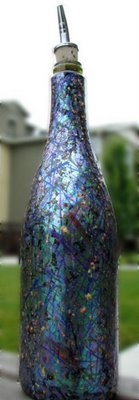

Michelle has been playing around with some faux dichroic effects and one of her pieces is this wonderful glass bottle. It is an effect you can recreate with any glass bottle, large or small – imagine how neat it would look on a recycled perfume bottle?

Materials
* Recycled wine bottle
* Bottle pourer (available from www.fantes.com/stoppers.htm)
* 12 oz black Fimo Soft polymer clay
* 2' x 8" Mylar backed foil – Oil Slick color (from www.coveredinclay.com/foil.htm)
* Jacquard Piñata ink – Santa Fe Red and Sunburst Yellow
* Lumiere paints in Metallic Olive, Pearl Blue, Pearl Violet
* Envirotex Lite
* Houston art foil – variegated leafing flakes
* PearlEx powder - Brilliant Gold

Tools
* Pasta machine or clay roller
* Tissue blade
* Large discarded plastic bucket or container
* Discarded plastic container to stand the bottle on
* For mixing Envirotex Lite: 2 disposable mixing cups, 2 wooden popsicle sticks, gloves
* Disposable paintbrush
* Curing oven

1. Condition clay. Roll sheets of clay at #1 (thick) setting approximately 3/8 inch thick. Use clay pieces to cover bottle – trimming away excess clay with a tissue blade and sealing joints to get an even coverage. Cover bottle to within ½ in of opening (polymer clay should not come in contact with surfaces which touch food).

Remove any air bubbles by slicing into the air bubble with a tissue blade or craft knife held at a 45 degree angle, press out the air and reseal the clay. It’s essential you get a good even coverage.


2. Apply the Mylar backed foil to the clay decorative side facing up. Rub the foil lightly but firmly with your hand repeatedly to warm the foil and then lift the plastic leaving the foil behind – foil adheres to clay with heat and friction. Continue and apply foil all over the bottle. Aim for just less than 100% coverage – small areas of black clay are desirable.

3. Using Lumiere paints and a small paintbrush, paint random long brushstrokes across the bottle. Cross the colors over each other – you’re aiming to give the project more dimension and color.

4. Using the Piñata inks, dip a brush into the inks and touch the brush to the surface of the bottle to make small dots. The inks spread on the clay so a little ink goes a long way.

5. Place the bottle into a cold oven preferably standing upright. Heat the oven to the required temperature with the bottle in it and then cure for the amount of time and at the temperature recommended by the manufacturer. Allow the bottle to cool in the oven before removing it.

6. Mix the Envirotex Lite according to manufacturer’s instructions. It works best if you pour both parts into one container and stir to mix. Pour the mix into a second container – do not scrape the excess off the sides of the first container when you do so. Continue to mix in the second container using a fresh stirring stick.

7. Stand the cured bottle on top of an upturned discarded container in the large bucket. It works best if the bottle is standing on a container slightly smaller than the bottom rim of the bottle. As the excess Envirotex Lite won’t be able to be removed from the containers, use containers you don’t mind damaging.

8. Add approximately 2 tablespoons of the variegated foil pieces and 1/8 teaspoon of gold PearlEx powder to the Envirotex Lite and mix in.

9. Place an old cork into the wine bottle to seal it. Working over the bucket, pour the Envirotex Lite over the surface of the bottle and work it in so it covers the surface of the bottle. This is best done with a disposable paint brush or a gloved hand. You must completely cover the bottle with the Envirotex Lite.

10. When the bottle is covered, stand it on the upside-down container in the bucket, remove the cork and leave it until set. Perching it on a container ensures that excess Envirotex Lite runs off the bottom of the bottle and won’t adhere to it.

11. When dry, remove the bottle from the bucket and remove the plastic container from the bottom of the bottle. If you need to smooth the bottom of the bottle, sand the excess set Envirotex Lite with coarse sandpaper. Insert the bottle pourer cork.

Tip
The Envirotex Lite gives the bottle a wonderful glossy seal. For best results, follow the two step mixing process and don’t scrape the first container however tempted you are to do so! The product must be mixed thoroughly so it sets to a hard finish, if you don’t mix it well and if you scrape the sides of the container, you risk it remaining slightly tacky instead of glass like – believe me, I’ve done it before!

Labels: , , ,

Tuesday, December 16, 2008

Lovely Little Matching Number


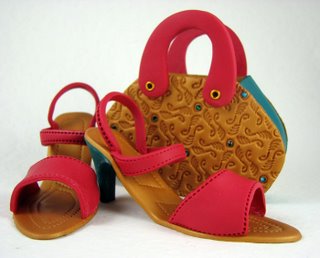
What better for an elf to go holiday shopping in than a set of matching heels and purse? Who could resist the glitter of Swarovski cystals and the Pavelka stamp design (from JHB) set into shiny Fimo clay! These are a "Looking Good" addition to anyone's tree. - mz


Fun with Modge Podge
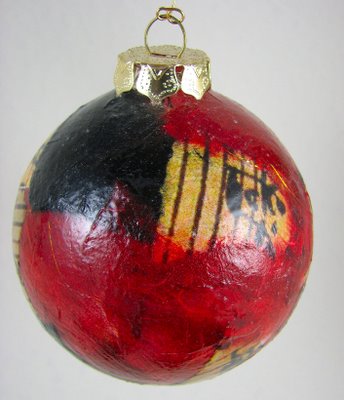
This week’s ornament is one that I’ve made some time ago but which I really still love. It’s a simple glass ball that has been decoupaged with black Mulberry paper, thin red tissue and some beautiful old music paper of which I had a couple of sheets and which I keep every last scrap of because it’s just so gorgeous. The combination of black, red and old paper really works for this ornament. It’s a simple process to decoupage the papers onto the ornament with Modge Podge and finish off with a final layer of Modge Podge just to seal it. And when the Modge Podge dries all over your hands you get to do that scary kid thing and peel it off like you're peeling off layers of skin - eeewwww
-hb

Cindy Gimbrone aka Lampwork Diva
Make a Confetti Ring to Wear at Your Next Holiday Party!

Holiday Sparkly Fan Pull
Lisa creates a dress up look for a ceiling fan

Linda's snowman
Some paper, beads, and fabric are transformed into an adorable snow guy.

Ornaments so easy... even a kid can do them!
A recycled idea from last year using pearl UTEE!

Poinsettia Madness
Beautiful poinsettias in glass.

Poinsettia Ornament
Polymer clay and glittery snow recreate a Christmas memory

Shiny Little Things
Felting for the Festivities!

Strands of Beads
Melissa has a quicker than quick snowball pendant for a perfect last minute gift.

Labels: , , , , , , ,

Wednesday, September 24, 2008

It's not easy being green


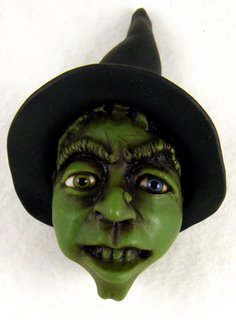
I bought a big (to me) screen TV and was singing along with Wizard of Oz while pondering the brew project. Then my favorite character the beautifully green Wicked Witch of the West was before me in 31.5 inch HDTV widescreen glory. I wanted to BE her! I offer you this lovely lapel pin that isn't a doorknob and which strangely looks a lot like me, but with green and oily skin.

From now on
I'll be history,
I'll be his...,
I'll be history
And OT will glorify my name!
I will be a bust,
Be a bust,
Be a bust,
In the hall of fame!

Tra la la la la la la la la la la
Tra la la la la la la
Tra la la la la la la la la la la
Tra la la la la la la


-MZ

Now check around and see what the other OT members have "brewed" for you this month:

BeadStyle & Milwaukee's heritage
Linda shares her Amber Bock Bracelet

Cindy Gimbrone aka Lampwork Diva
New Beads are Brewing...

Double, Double, Toil and Trouble...
Joolz by Lisa has a "Hairy" Twist on OT Brew.

The Art Bead Scene
Jennifer's Not-So-Scary Halloween Bracelet

Brew'in up a few Witches
Witches born of glass

Strands of Beads
Something wicked is brewing at Melissa's place

Swelldesigner
Alexa stirs it up with this retro witch wall hanging!

Labels: , , , ,

Wednesday, May 28, 2008

Ornament Thursday and the insects are out!


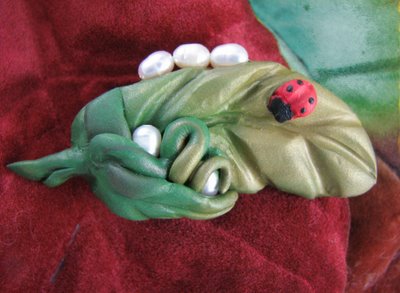
This month's insectia inspiration came from a class which I attended recently with Christi Friesen. Christi does some great things combining pearls and bakeable jewels with polymer clay. I created this leaf design using some green clay left over from a caning project. Attached to the leaves is a snake of clay, and in the curves and down one edge of the large leaf I wired small freshwater pearls into the clay. The ladybug – insectia! - is a small dot of red clay with black accents. I don’t think that leaves are ever quite complete without at least one ladybug attached.

The completed project can be finished with a pin back and used as a broach or, better still, a simple hanging mechanism can be added so it can be affixed to a necklace of polymer clay beads and pearls. HB


Michelle has been busy this month too. I snuck a look at her project and here it is. Nothing from her yet explaining her work – probably because she is wrist deep in a milk carton full of Mix and Mold molding compound. She's casting hands for a fun Halloween project. Hopefully her hand gets out in time for her to eat dinner!

If you're curious to see what other ornament Thursday artists are up to this month, click the links below to check out their wonderful work:


Art Bead Scene
Dragonflies are all the rage, art beads & brass combine in a 1920's inspired necklace.

Beading Help Web's DragonFly Anklet
Make this cute anklet for summer in just minutes!

Linda at Make It Mine magazine
Make your own dragonfly top--check out the instructions and video!

Savvy Crafter-
See some cute as a bug pins over on Candie's blog....

Humblebeads
Flying to a fashionable ear near you, a free project from Humblebeads.

Hali Chambers

Katie's Beading Blog
Make a fun little winged thing from a handful of wire and beads.

Swelldesigner
You'll get butterflies when you see this summer-inspired necklace with butterfly pendant

fromichelle
Insectica

Labels: , , ,

Tuesday, February 6, 2007

Clay and CHA

We've all just returned from CHA where we not only had a wonderful time but also lots of success.

Michelle and I, together with Frank were chosen as finalists in the Amoco Bottles of Hope challenge and I won the Most Original award!

We got to hang out with lots of clay people and, at our hotel, we were next door to Gail Richie, Leslie Blackford, Kim Cavender and just two doors away from Donna Kato. Since we were all on the ground floor by the pool we got to hang together which was great fun.

Here are some of Donna's photos too. Check out the right hand side (5th image down), left hand side (6th image down - it was Australia Day after all!) and (right hand side second to last photo)

You can read about some of our discussions with Donna Kato on her blog, including that we seem to have talked her into a competition for CHA next winter - Yeah!

I also met Claudine Hellmuth who had done a commission piece for Michelle and me so that was fun too.

Took a class with Tim Holtz on inks which was great fun as his classes always are.

The show really was wonderful and Anaheim sure beats Las Vegas!

Labels: , , , ,