Tuesday, December 23, 2008

More Friendly Plastic Ornaments!


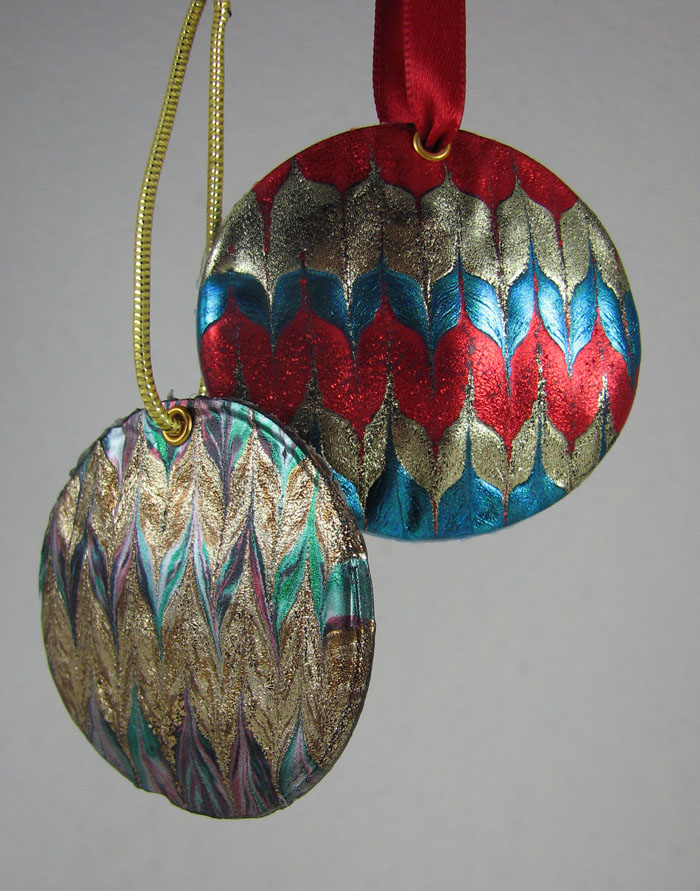
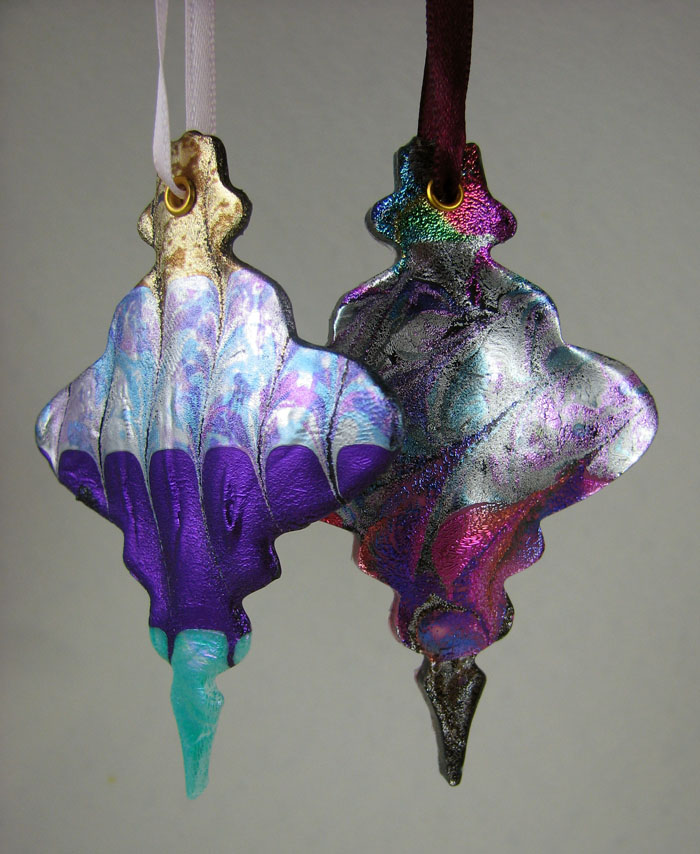
I just couldn't stop making Friendly Plastic ornaments. These are nice and round. No edges for the cat to whack her paw on as she helps Helen decorate the tree. These were made using a marbling comb. There's almost no wrong color combination though I plan on testing out black against black.


Have a safe and peaceful holiday season. Look for more Ornament Thursday posts in the new year. - mz


Recycled trees

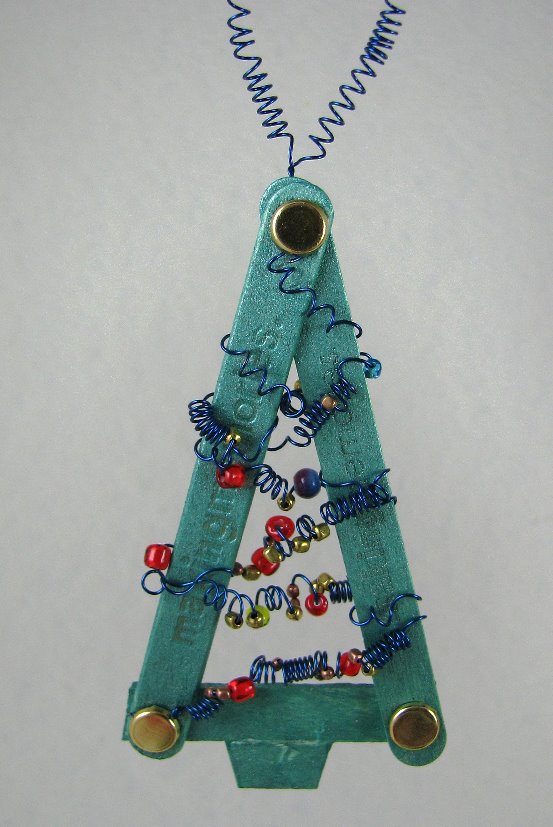
My final ornament for Ornament Thursday is made from some recycled rub-on sticks of the kind that you get when you purchase alphabet rub-ons. These are from Making Memories so they’ve got Making Memories actually stamped into the surface of the wood which is why I chose them. The sticks have been painted with turquoise pearl paint and cut to size. I punched holes in them using a Crop-O-Dile and affixed large brads through the pieces to make the tree shapes.

The bottom of the Christmas tree is a cut piece of one of the sticks attached with Glossy Accents. You really have to love Glossy Accents because it really sticks anything to anything. The design is finished off with some artistic wire which has been wrapped around a knitting needle. I threaded small beads onto the wire and then incorporated them into the twisted design as I made the coil. Remove the strip from the knitting needle and all you have to do is wind it around one of the brads and then through and around the Christmas tree shape and finish it off by winding the other end around the topmost brad. The tree hangs from another piece of coiled wire. -hb

To check out what the rest of the ornament Thursday team has been doing this week, visit: http://www.ornamentthursday.blogspot.com/

Labels: , , ,

Tuesday, December 9, 2008

Friendly Plastic Ornament Recipe


Melt Friendly Plastic, swirl it around and cut out the pretty design with your favorite ornament cookie cutter. Pop an eyelet in and hang. Tada! A simple recipe for hours of fun. - mz


So, I'm Sewing again?
Continuing in my sewing theme for Ornament Thursday, I have a cute pair of felt mittens. I made my own pattern for the mittens, cut them out of felt and then sewed around all but the top edge and filled with fiber fill. I used some off-white wool roving to needle felt the cuffs.

The mittens are tacked together so that they’ll sit neatly and I used a metal snowflake brad on each to decorate them. An additional snowflake brad is attached to the felted cuff of the front mitten. The mittens hang from a piece of light cord. I really think that even though my first two ornaments this Christmas have been sewn it’s time to look for another medium next week - hb.

Now, it's time to surf over to check out what everyone else has been up to this week.

Cindy Gimbrone Puts Up Her Xmas Tree!
Fused Glass Xmas tree ornament sparkles from Cindy's real Xmas tree.

Gingham and beads and buttons, oh my
Counterchanges smocked gingham forms the foundation for this homespun ornament

HHH Enterprises
We are pleased to have this special guest join us this month!


My Favorite Things in an Ornament!

Lisa shares a special gift ornament

New Beaded Ornament
See our special guest's beautiful creation!

Secret Garden Christmas Tree Ornament
Michelle's got a special tree from the Botanicabella collection!

Strands of Beads
Melissa shows off a simple winter rose bracelet project this week.

Labels: , ,

Thursday, September 25, 2008

Friendly Plastic Open Challenge

AMACO just announced that they're having a Friendly Plastic open challenge. Check out the challenge details here.

It's an open challenge for general crafters as well as designers. Feel free to post this information on your own blog or any other appropriate forum. We can use the help getting the word out.

They'll put all entries up on their website and the items themselves, depending on what they are, will be either auctioned off to raise money or donated. The more people that participate the better.

Among others, there's a Bottle of Hope category with donations going to the Hasbro Children's Hospital, and a Butterfly category with the butterflies going to the Holocaust Museum Houston.

The butterfly exhibit is scheduled for 2012. Can you imagine 1.5 million butterflies? Check here for more information about the Butterfly Project.

Labels: , ,

Wednesday, June 25, 2008

Independence and Ornament Thursday


The house is full of plaster hands in various positions and colours but my real hand is unstuck in time for this month's Ornament Thursday!

This pendant is called Independence from Race and Religion. I've sculpted a woman's face and used bits from Krafty Lady Art Moulds. Her cheeks and hair are from parts of a key and keyhole mould. Kristine, the Krafty Lady herself, has a quality product that is wonderful to use. I've not found a medium yet that can't be used in her moulds... Friendly Plastic, Premo, Fimo and Kato clays, plaster, wax, Magic Mud, hot glue.... but I digress. (sorry)

Originally the woman in this pendant started as pink clay and African American features. I wanted to see what oil paint did to clay so now she's nicely aged and has a lovely glow about her... but she's not so pink. The reverse is backfilled with textured black clay (thanks Lynne!) and has a brass tube running down the length to hold her weight (thanks Tommie!)

Here is what the other OT members have been up to this month:

Alexa Westerfield a.k.a. Swelldesigner
Craft some red, white, and blue drink charms from vintage wartime posters. They’ll make a big bang at your 4th of July cookout!

Cindy Gimbrone aka Lampwork Diva
Celebrate the Independent Spirit

Hurray for Red, White and Blue
Lisa takes a shot at teeny tiny beads for a change

Strands of Beads
Melissa sees stars this month while considering the meaning of independence

Labels: , , , , , , , ,

Monday, April 7, 2008

Krafty Lady molds save a reluctant jeweller..


Krafty Lady Art Moulds are pretty amazing – they can take a whole lot of abuse and they still come out fighting. This time I blasted them with one of those neat heat guns from Ranger, guaranteed to get the heat in the right place every time without a blast of air to scatter everything everywhere.

So, I was supposed to be making a necklace with Friendly Plastic – which, if you haven't used it is a totally cool product. Since I'm the kind of person who routinely colors outside the lines, I looked at the Friendly Plastic and then at the first of my new designs from Krafty Lady which features my African mask carvings and thought that here was a way to get out of making necklaces sitting right in front of me. How would Friendly Plastic work in my moulds? Giving only a passing thought to the possibility of frying the moulds I placed some pieces of Friendly Plastic in them and melted it by waving the heat gun over it!

Some what to my surprise, I admit, the plastic melted and the mould was fine. I left the plastic to cool in the mould and then, with the help of some cold water, the plastic molded shape popped out. Needless to say the necklace project was left standing in the dust and I spent the next hour molding colorful African masks from Friendly Plastic some of which you can see in the photo.

If you're doing this at home, start with Krafty Lady Art Moulds – they work well because of what they're made of and other molds may not stand this abuse. In deep moulds like the African masks work by layering strips of plastic inside the mould instead of using one big piece of plastic because the big pieces sort of drip into the mould whereas using strips lets you plan stripes, dashes and all sorts of designs. Zap the pieces with the heat gun and watch as they melt into the shape. Then set aside for a few minutes to cool – don't touch them because they're hot! Then pop the mold and Friendly Plastic into a tub of water and pop out the finished pieces. Too easy… and way fun. MZ.

Labels: , , ,